Friday 15 April 2016

Week 14 - Submission

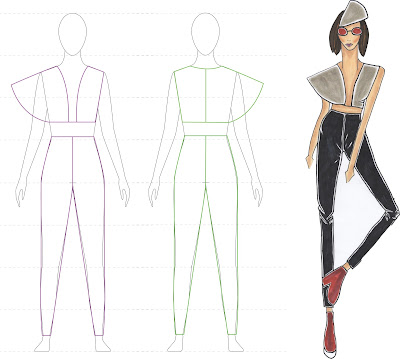
Semester 2 has come to an end. And as for our last submission, we have to choose a design that we have done for illustration class and draw it as a technical flat for submission. I have chosen this edgy wear collection and it is something that s very straight forward and simple to draw.


In order for me to draw this technical flat, i've used the pen tool to help me draw all the shapes of the garment. It is very easy to use the pen tool as my design are mostly straight lines and from there i can adjust to make the curve by using the convert anchor point tool. 

I also used two different colour to indicate the front and the back. The purple will be the front view and the green will be the back view. 

It took me like at least 1 hour and 30 minutes to complete the whole technical flat.
Overall, the only difficulty that i faced was to adjust to make a nice curve and i have to try it a few times before i could finally get the right one. 
Monday 7 March 2016

Week 8 - Illustrator Assessment

Today was assessment for illustrator. We have to create a fabric board with the image given by the lecturer. For a moment, i was a bit lost on how to start the fabric board after a one week break. But i managed o recap what he hd taught us and i finish within 50 minutes. It was actually easy because it was a very straight forward images whereby all you need to do is crop and put it in a correct position. 


I look forward to the next lesson where we will be learning something new and more interesting other than doing fabric boards.


Wednesday 24 February 2016

Week 6 - Introduction to Illustrator

We finally come to an end to photoshop lesson. Moving on with today lesson, we will be learning a new software known as Illustrator. As a fashion student, illustrator is important to us as we need it t draw our garment technical drawing. Most of the tools are similar to photoshop but it is more complicated as it does have the same function. 

For the first exercise, we explore the different type of tools and get a brief idea on how illustrator works. Here are some of the exercises that we did in class.


As for this exercise, we use different type of selection to create different shapes

As for this exercise, we practice drawing the shapes using the pen tools. 

After we get the hang of this, we move on with technical drawing of the jacket. Drawing the lines of the jacket using the pen tools was easy. What makes it more difficult is when we have to flip the one side of the drawings to complete the whole jacket. I was having a hard time to catch up with the lesson as i could not get the lines right. After a few try, finally i  understand how does the thing works. Overall, it was easy to draw the technical drawing by having a template underneath. 


Not only that, we also learnt how to do fabric board. It is much more easier than drawing technical drawings. Fabrics board s similar to mood board and it have less thing going on. I did 2 fabric board for a practice. 


Tuesday 23 February 2016

Week 5 - Photoshop Assessment

As for our assessment, we were given a folder with the images in it. We have to create a mood board with the images given and use all the technique that we have learnt in class. The mood board was inspired by the Japanese culture. 

Here are some of the images that was used for the mood board. 


Well,it was a little bit hard compared to what we have done in class. The images have more details and i was having a hard time to crop the parts that i do not need it.  I took almost 2 hours to complete the whole mood board. At the time it was a good revision for us so that we will remember all the tools that are commonly use. 

This is the final mood board that i have produced during the assessment. It does not really look exactly the same like the example that the lecturer gave us. But i managed to crop the images and make it look as clean as possible. 


Friday 12 February 2016

Week 4 - Revision for Photoshop Assessment

Finally we have come to an end of the photoshop session. As our assessment is next week, our lecturer decided to do some revision for about 30 minutes before our class end. During the revision, we just go through what we had learnt in class so far and try to recall all the different tools and the purposes of each tool. 

Well, i have to say that it was really hard for me because i am having a hard time to memorise all the step. But at the same time i was glad that i could catch up with the lesson. Maybe all i need is a lot of self practice at home so that i will be familiar with all the tools and understand the purposes so that in the future i will not have a hard time doing any photoshop project. How i wish photoshop lesson will have a longer session so that we can learn other new things instead of just the basic. Nevertheless, it was worth the time in class going through the computerised technical drawing class.

Friday 22 January 2016

Week 3 - Mood board

As for our third lesson, we start to learn how to create our mood board using the photos given by the teacher. We started off with the basic by adding the background and how to change the opacity of the image.


After we are done with the background, we add in the design and use the tools under the layers column.  The purpose of that tools is to remove certain part of the photos that we do not need it without using any cropping tools such as the lasso or the magic wand. It is one of the fastest and the most clean way to remove unwanted things from the images itself. 


We also use the brush tool to move the part that we do not want in the image. Example the gargoyle. Reduce the opacity of the brush so that it is easy for us to paint the unwanted part. 


And lastly we add in the image and use the column on the right to change the opacity of the images according to the mood we want it to be.


This 2 hours lesson i have learnt a lot. Other than those basic things such as the magic wand and the paint brush, i also learnt some other tools that we hardly use while we are doing our work. Looking forward to the next lesson and hopefully i can catch up with the lesson so i can apply the technique that was being taught while doing our moodboard.

Sunday 17 January 2016

Week 2 - Introduction to Photoshop

Previously during the first lesson, we were told to watch this video on lynda.com about photoshop. That video will give us a rough idea about what photoshop is all about. Week 2 lesson, we learn how to use the basic photoshop tools with the help of our lecturer.We learn how to use the 4 basic tools to crop and also drag the photos.

First,the move tool. It is for us to drag the photos anywhere we want it to be.

Second,the marquee tool. There are different shapes such as rectangular, elliptical, single column and single row.

Third, the lasso tool. There are different type of lasso such as polygonal lasso and magnetic lasso.

And lastly the quick selection or magic wand. 

All the 3 tools have the same functions which is to crop photos. Some might prefer different ways of cropping photos. We were given the chance to explore all the types of tools and do some practice on our own. I admit it is not that easy as we cannot control our hand movement.

I look forward to the next lesson where i can explore more on the different types of tools.